Swagger를 활용한 api documents 만들기 - 2탄 (Swagger UI & yaml 작성방법)
앞서 Swagger를 활용한 api documents 만들기 - 1탄 (Swagger Editor)에서 경험한 Swagger UI 프로젝트 실행까지 봤다면 이번 포스팅에서는 Swagger UI에서 사용되는 코드와 구성 및 yaml 코드 분석과 팁을 보도록 하겠다.
Swagger를 활용한 api documents 만들기 - 1탄 (Swagger Editor)
Swagger를 활용한 api documents 만들기 - 1탄 (Swagger Editor) 우리는 사용자들이 필요한 Application Program을 만들었을 것이며 거기에 필요한 Web과 Service들을 만들었을 것이다. 이것들을 자유롭게..
rjs5967.tistory.com
Swagger UI 개요
- Swagger Editor에서 작성한 yaml 혹은 json 파일을 사용하여 디버깅 할 수 있는 환경셋팅 구성과 Api Documents를 확인할 수 있는 UI 로구성
Swagger UI 사용법
- Swagger Editor에서 생성된 nodejs-server로 설명함.
- 터미널에서 npm start 명령어 실행 (README.md 참고)
- http://localhost:8080/docs 접속하여 Swagger Editor 에서 작성한 api문서가 맞는지 확인
Swagger UI 화면 구성과 yaml 코드 분석 (작성방법)
- 화면완성도

openapi: 3.0.0 특징
- HTML 언어 사용가능- Tab으로 문단 구분 확실하게 해야함- 작성법 오류 시 최상단에서 확인 가능- 사용안하는 코드는 해당 코드의 왼쪽 끝 부분에 삼각형 느낌표 표시로 나타남
정보
- 코드
info:
  title: 에코의 api documents ( OPEN API )
  version: 1.0.0
  description: '<b>Description:</b><br>
    1. The part is divided into <b>Partner, and Console</b> <br>
    2. You can call the API by receiving the <b>Auth token key</b> corresponding to each part and <b>registering it in Authorize</b><br>
3. You can check the <b>schema</b> to know the information you need to enter.'- UI

api 서버 (select box로 선택 가능)
- 코드
servers:
- url: https://api_rjs5967.co.kr/v1
- url: http://10.20.0.5:5000/v1- UI

api list
- 코드
tags:
- name: partner/auth
  description: Partner-Auth API
- name: partner/dashboard
  description: Partner-Dashboard API
- UI

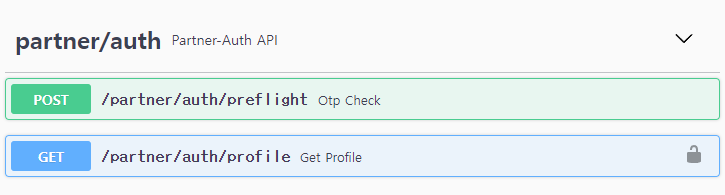
api url
- 코드
- 2줄 : api 주소 입력
- 3줄 : Method 설정 - post/get/put/delete
- 5줄 : api list 그룹 중 속할 곳
- 6줄 : api list 그룹의 요약내용
- 7줄 : api 상세 설명 (HTML 코드 삽입가능)
- 9줄 : request body data 경로 지정
- 11줄 : response code 지정
- 15줄 : schema모델 설정 처럼 동일한 구조로 response data 형식 지정
- 34줄 : 보안 설정
- 35줄 : PartnerAuth 이름의 보안 생성
- 36줄 : securitySchemes에서 설정한 PartnerAuth를 사용
paths:
  /partner/auth/preflight:
    post:
      tags:
      - partner/auth
      summary: Otp Check
      description: Checks whether Otp exists. <br> true if Otp exists false if not.
      requestBody:
        $ref: '#/components/requestBodies/Preflight_Request'
      responses:
        "200":
          description: successful operation
          content:
            application/json:
              schema:
                type: boolean
                default: false
                x-content-type: application/json
  /partner/auth/profile:
    get:
      tags:
      - partner/auth
      summary: Get Profile
      description: Get profile information.
      responses:
        "200":
          description: successful operation
          content:
            application/json:
              schema:
                $ref: '#/components/schemas/PartnerInfoModel'
        "401":
          description: Requires authentication and authorization
      security:
      - PartnerAuth:
        - PartnerAuth
- UI
- 자물쇠 모양은 보안 설정이 되어 있어 인증이 필요하다. (위의 34줄 설정)
authortication
- 코드
- 2줄 : 보안 이름 설정
- 4줄: 인증방법 종류 작성
securitySchemes:
  PartnerAuth:
    type: http
    scheme: bearer

  ConsoleAuth:
    type: http
    scheme: bearer
- UI
Authorize 버튼 클릭 시 아래와 같은 팝업 생성


schema(모델 설정)
- 코드
- 5줄 : 기본값 설정
- 10줄 : 이미 생성한 schema를 호출
components:
  schemas:
    Error_Type:
      type: boolean
      default: false
    Return_Body_Array_String:
      type: object
      properties:
        error:
          $ref: '#/components/schemas/Error_Type'
        body:
          type: array
          items:
            type: string
          description: domain list
- UI

requestBodies(Body Data설정)
- 코드
- 5줄 : request body data type 설정
- 7줄 : 필수값 표시
- 15줄 : body data 입력 시 예제 값 설정
- 20줄 : data를 필수로 입력해야 하는지 설정
requestBodies:
  Preflight_Request:
    description: Preflight
    content:
      application/json:
        schema:
          required:
          - password
          - username
          type: object
          properties:
            username:
              type: string
              description: username
              example: username
            password:
              type: string
              description: SHA256
              example: SHA256
    required: true
- UI


swagger 2.0
- 참고 url
Tip - api 리스트 옵션 설정(docExpansion 옵션 추가)
- node_modules/oas3-tools/dist/middleware/swagger-ui/index.html -> SwaggerUIBundle({}) 호출 시 옵션으로 docExpansion: 'none' 추가 하면 모두 접기가 가능하다.
- docExpansion 옵션
- none : 모두 접기
- list : 파트별 펼치기 (내용 감추기)
- full : 모두 펼치기
- docExpansion 옵션
window.ui = SwaggerUIBundle({
  docExpansion: 'none'       // 원하는 옵션으로 추가   default는 list
})
위 코드 입력 시 아래와 같이 api 리스트 들에 대해 모두 접기가 가능하다

'IT > Node.js' 카테고리의 다른 글
| Swagger를 활용한 api documents 만들기 - 1탄 (Swagger Editor) (0) | 2022.05.12 |
|---|